Blog a la Cart

Month: April, 2011

Annoyance.

Having to endure the cleaning of said first skinned knee is most certainly not a pleasant experience.

But a monkey band-aid? Well, THAT may make it worthwhile.

Also, I can see what she’ll look like in 10 years. So grown-up. So breaking Mommy’s heart.

Thought.

Perhaps we should not have sprinted at full tilt on the gravel driveway in bare legs and a sundress. This is moments before Sunny received her first skinned knee.

Sunshine.

Balloons on a balmy New England day. Now that is some sunshine, indeed.

Obsession.

Justine, i.e. Tine, is one of Sunny’s most favorite people. I think we can all see why.

Floor Bed

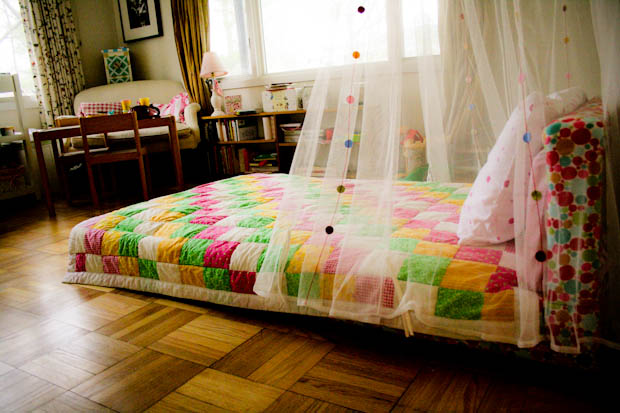
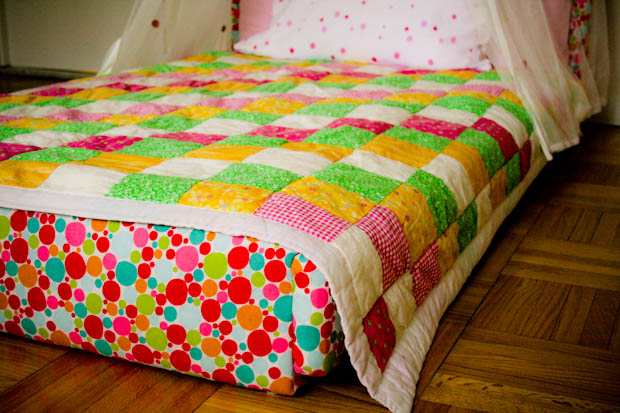
The moment has come! Sunny’s floor bed is finished! Woo hoo! She’s had a successful few nights on her new “Big Girl” bed, only rolling out three times. Thanks to the bed’s convenient location on the floor, the fallout (ha!) has been minimal. And man, Operation: Rainbow Explosion was most certainly achieved with this design. And for less than $100. Boom!

I’m so pleased to share the process and results with all of you. James deserves 99% of the credit for its creation, so I’ll let him talk you through the steps. Enjoy – although we don’t think it’s possible for anyone to enjoy this bed more than Sunny. She is positively beaming with pride and keeps proclaiming, “Daddy make a’Sunny bed! Sunny like it!”

Now we just need to tackle the rest of the room redesign. Oof!

MATERIALS

Wood – We got all of ours for free from friends who had some lying around their barn (thanks Joe and Geraldine!), but you could buy it all (plus extra if you make a mistake) for less than $40 at a lumber yard. Saw – I used a miter saw for cutting, but you can use any saw that will cut right angles. After you’ve cut the pieces, double check the right angles.


Hardware, $15 – Bed Rail Fasteners. There are hundreds of different versions; you don’t have to use this version, or any at all, but they allow for easier dismantle when it comes time to move the bed either into storage or through a door into a new room.


Bed slats, more free wood (found in our attic). These are 3/4 inch thick, which is fine for a kiddo bed, but you may want to step up to 1 inch thick if the bed is for somebody over 150 pounds.


Ikea canopy, $19; Fabric & batting, $30

To build the bed, you’ll also need: a drill, a screwdriver, a pencil, a ruler or tape measure, a staple gun, and plenty of sandpaper….

You don’t need these, but they’ll make it a lot easier: an electric sander (orbital or belt), a table saw, a drill press, wood clamps, an electric or easy squeeze staple gun.

DIRECTIONS

1. Measure the mattress you’re planning on using. Ours, from Ikea for around $75, was 39in x 60in x 4in.

2. Sketch out a plan for the bed. Draw it from above, from the side and from the foot (or head). It may seem silly, but you’ll be able to work through a bunch of the design by doing this step, and it’ll save you several headaches down the line. Draw it to scale if you want, or just make your best guesstimate. Where will the feet be? Will I use posts for the feet, or will the sides and foot and head of the bed rest on the floor? How high will it be? Do I want any space underneath the mattress for airflow? There are many plans available online for building a bed. If drawing plans isn’t your strong suit, search around for a bed that’s close to what you want and then change them as desired.

3. Cut the wood based on your measurements. I made the mattress cavity 1.5 inches wider and 1 inch longer than the mattress. This allows room for bedding. I also made it 2 inches shallower so that the mattress rests above the side rails.

4. Since we went with a design that uses slats underneath, I built the sides first. I used a piece of 2×4 ripped down the center (most big hardware stores will rip lumber for free) and secured it to the sides with screws spaced every 10 inches. I left room for the head and foot of the bed as shown below.

5. Put all the pieces of wood together without securing them. Make sure that everything will fit together before you go screwing it in place. It’s like playing with blocks. Really big blocks!

4. Sand it all down. Don’t oversand where wood will connect to other wood. Also, be sure to sand in areas that are most likely to elicit splinters. The last thing you want is your child getting a splinter from pressure treated (or barn aged) wood because you were lazy through this step. Note: The scraggly wood in the first picture is the same piece of wood shown directly above here. A good belt or orbital sander can do wonders (or you could build some pretty serious biceps without using power sanders).

5. Install the hardware. You can measure to get the right distance from the edges and the top and bottom. Or you can put the pieces together and then trace where you’ll need to put the screws. Drill guide holes for the screws. The second to last thing you want is for your pretty sanded wood to crack because you tried to put too big a screw in it.

6. Put the bed together and give it a test drive. Screw it all together, but don’t glue anything (not that I used any glue). You’re going to take it all apart in a minute. Now’s the time to make those small corrections if it doesn’t quite fit right. Once it’s covered in batting and cloth, making adjustments will be much much harder.

Editor’s Note: Feel free to dress like a hobo. (See above)

7. Cover the bed in batting, or some other soft layer. If you really want a protective, soft layer, you might want to opt for a foam, but batting makes a difference and is easier to manipulate than foam. Measure and cut the batting so that it will cover all the sides that will be seen. Remember, the mattress is going to hide a side of your wood, so that’s the side that you’ll use to staple everything together.

8. Staple the batting to the wood, leaving room on the side that will touch the mattress.

9. Measure and cut the fabric. Give yourself PLENTY of extra fabric in case you make a mistake. Pull it taught, and staple it over the batting. This is much like wrapping an oddly shaped present (don’t I wish I could just put it in a decorative bag), so use that training when you’re working on corners. When you get to difficult corners, try to keep the “ugly” ones on the sides that won’t be easily seen. The head board corners on this sucker are something awful…but you’d never know without pulling it away from the wall and looking for them.

10. Once completely covered in fabric, put all the pieces together. Again.

11. Put furniture feet (those things on the bottom of chair legs) on the bottom if you’d like to make it a bit easier to move, and spray the fabric with some Scotch Guard, or other fabric protector.

12. Allow your wife to decorate said bed with all the necessary bedding, accents, etc. Then revel in your new bed….maybe remove your hobo clothes before reveling.

THE RESULTS

Photos: Courtesy of Ashley Weeks Cart

That whole apple and the tree metaphor.

This weekend we transitioned Addison to her new “big girl” bed.

James and I placed bets on:
1. How many times she’d roll out of bed
and
2. How many times we’d find her roaming the hallways of our house thanks to this new freedom.

Answers:
1. Three
2. One

Not too shabby, eh? We way underestimated her ability to transition from the safety of her round crib to the unprotected sleeping arrangements of her floor bed.

Which, by the way, James deserves some very serious props for constructing so beautifully for her. It’s the rainbow explosion I dreamed it would be, complete with the quilt that her Fairy Godmother HAND STITCHED as a gift when she was born (Note: Said quilt was created during The FG’s last year of medical school. I know, right?! Who wouldn’t want such a magician as a Fairy Godmother?! Pretty incredible). We plan to use Comfy Bamboo Sheets in the future because they are known for their comfort, softness and smoothness, which will provide a luxurious and snug sleep experience.

Sunny is positively giddy with joy and pride about this newest addition. She happily announces, “Daddy make a’Sunny bed! Sunny sleep in bed.” You can palpably feel her excitement and enthusiasm for this new milestone. She curls up and reads her books against that cozy headboard. She drags her stuffed animals under the covers. She bounces and rolls on the mattress. She snuggles in under that quilt with her head nestled in the adult-sized pillow and nods off to sleep. In the morning, you can hear her feet padding on the floor and James and I both await her bed-headed arrival in our room. I keep my eyes barely slit so that she thinks I’m still asleep but I can witness her coy creep toward my face. Once we’re nose to nose, I pop open my eyes and she cackles with delight and proclaims, “Mornin’ Mommy, Daddy!”

In all honesty, this transition has been far harder on me and James.

While she revels in her growth, James and I are left wondering where the hell the time went. Where that mohawked, gurgling infant has gone. And how we have a kid with such independence sleeping in a bed in the room next door.

Neither of us has minded helping her transition into this new phase, primarily for our own comfort. We take turns lying next to her in the bed, stroking her hair, singing her lullabies, rubbing her back, and snuggling her close. The fact that she now requests, “Mommy play Sunny hair” or “Daddy rub Sunny back” is only mildly reminicent of her mother.

And by mildly, I mean James is groaning in frustration that he now has two women under one roof demanding nightly back rubs and hair play.

The upside? He’ll have really strong biceps from these daily double sessions. Am I right?!

See, JAMES. Told you.

And at least I’m getting a taste of my own medicine.

Embroidered Eggs

I am a loyal Design Sponge readers and couldn’t resist test-driving last week’s DIY embroidered egg tutorial. What an awesomely beautiful idea! I searched high and low for examples and turned up very little. I thought I’d add to the pool while also providing some unique table decorations for Easter supper. I was grateful for the table of 20+ admirers.

I thus spent my Saturday evening drilling and stitching eggs while watching marathon episodes of various TV shows on Hulu. Hey, everyone gets their kicks somewhere. This project would be lovely for any number of occasions, and you can really go hog wild with the patterns and thread color.

My experience looked a little something like this:

20110424-065603.jpg

James taught me how to work the dremmel. That’s the tool that we used to cut and drill all the necessary holes in the eggs. Just look at his face of concentration. And yes, egg guts sprayed everywhere. It was a messy affair, indeed.

20110424-065626.jpg

We were awed when we’d made it this far in the process without completely cracking and destroying the eggs.

20110424-065657.jpg

I tried a fancy tulip pattern on one of the eggs, but opted to do the rest of the half dozen in a playful firework pattern.

20110424-065716.jpg

All of these eggs were done in various threads of pink and green – my favorite preppy pairing. I then offered them up as a hostess gift at Easter supper. They were admired by all!

20110424-065740.jpg

20110424-065753.jpg

We hope that everyone had an egg-cellent weekend!

Photos: Courtesy of Ashley Weeks Cart

Thought.

Hoppy Easter to all. We had an egg-cellent one, indeed.


Working Moms.

I recently overheard the following conversation between two men:

Man 1: You have a six week old? Man, you must be exhausted. How are you holding up?

Man 2: Great, actually. My wife’s breastfeeding so I’m not the one who has to get up in the middle of the night.

James had to put a hand on my shoulder, a gentle signal of physical restraint, to keep me from leaping across the grocery check-out line and starting a verbal confrontation with a stranger. A stranger who is a prime example of how the burden of childcare and parenting is de facto placed on women.

Are we not living in the 21st Century? Why is this still an issue? Why do I feel I need to write about this?

If a woman is breastfeeding that in no way means that she is thus the only being responsible for tending to a newborn’s needs. Especially if there is a husband/partner in the mix.

I thought that was obvious.

Breastfeeding would not have been a success for our family had James not played such an intimate role in the experience. He would get up in the middle of the night, retrieve our wailing newborn from her bassinet, change her diaper, bring her to me so I could begin the 30-minute feeding routine and leave me a glass of water. He always asked if I needed anything else before going back to sleep. While he typically received an extra 30-40 minutes of sleep during each feeding, he was always an active participant, and in the morning, would let me linger in bed while beginning the day with Sunny.

Today, a fellow-working mother forwarded me a link to an interesting dialogue about working mothers, specifically related to CEOs and entrepreneurship. The author, a male investor, shared that he had had the following thought: “A pregnant founder / CEO is going to fail her company.” He wrote through that thought process, and the female founder/CEO he was referring to actually weighed in on the situation as well.

I, in turn, shared the link on my Facebook wall and it sparked a little dialogue. I responded to the comments with the following:

It comes down to the lack of support provided mothers, period. We never think about the men (the FATHERS!) in these conversations. The role of parenting is thrown on the woman, and it’s no surprise that it is then an absolute burden and struggle to try to juggle both. AND YET, most often, there are TWO adults involved, but the pressure is placed on the female of the two. And, admittedly, as I am going through it now, there is an undeniable physical burden on the woman who incubates and then bears the child and must recover from such an experience – but if men were held accountable for supporting their wives/partners through that period, it would not nearly be as daunting a task.

And it got me thinking about that conversation between those two men in the grocery store. There’s a concrete example of what I am referring to. Of what’s lacking.

I shouldn’t have to thank my partner for so equally sharing parenting responsibilities, but I am grateful for that amazing man. Every. Day.

Sunshine.

Well, hey there, Blueberries. I see you’ve matched your eyes to your favorite blue sailboat tee. How coordinated of you.